It seems like a regular occurrence. You’re looking through your favorite fishing magazine or scrolling through one of the many saltwater fishing forums on the Internet and you come across someone touting the latest “new” knot that you just have to learn. Most are overly complex versions of basic knots that have been around for a long time, only they look like they require five hands to tie. Fishing knots don’t have to be that difficult or confusing. A wise mentor once advised, “You’re better off knowing a few knots you can tie well than a bunch of knots you tie poorly.” Sage advice. Here are four knots that are simple to learn, easy to tie, and when done correctly are as strong, if not stronger, than the latest new knot of the month.
In the following photos note that we used heavy yellow braid making the steps easier to see. The line type recommended for each knot is mentioned in the description. You will see two terms in each set of instructions—the tag and the running line. Tag is the end of the line or leader being used and running is the line that leads to the rod and reel. And a word of advice that pertains to all fishing knots—tightening the knot at the end is the most important part of the procedure. You can do everything right but if you rush the sinching and final setting of the knot it will not be as strong and will eventually fail.

Uni-Knot
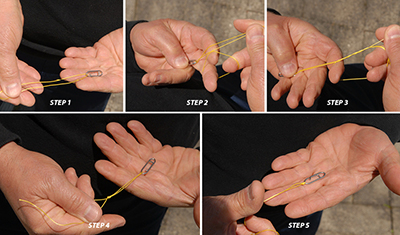
Let’s start with a long-time favorite that is used to tie on a straight-eye hook, snap, swivel—pretty much any type of terminal tackle using monofilament or braid. It’s incredibly easy and tests out to over 95%of the breaking strength of the line when tied carefully.
Step 1: Run the line through the hook, or in this case a snap, and leave yourself at least six inches to work with on the tag end.
Step 2: Using the fingers of both hands form a loop in the tag end line alongside the running line.
Step 3: Now run the tag end through the loop and around the running line five times for monofilament or six or seven times when
using braid.
Step 4: Gently pull on the tag end to begin tightening the loop until it is bunched up cleanly, but don’t pull it tight yet. Make sure none of the wraps cross over another when tightened.
Step 5: Hold the snap or hook in one hand and the running line in the other. Wet the wraps with saliva and slide them down. Pull hard to lock the knot in place and clip off the tag end.

Snell Knot
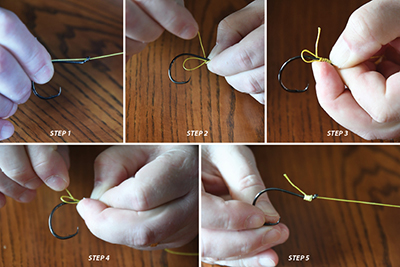
A snell knot is used when tying on hooks with eyes that are offset up or down. This allows for a straight pull between the line and the hook shank. Hooks are almost always snelled using monofilament or fluorocarbon leader material. While there are several versions of this knot, this one is the easiest to tie and it tests out to 100% of the breaking strength of the line.
Step 1: Run the line through the hook eye with about five inches of tag to work with.
Step 2: Make a loop with the tag line and pinch it between your fingers.
Step 3: Wrap the remaining tag line around the loop and hook shank five or six times working towards the bend of the hook.
Step 4: Pass the tag end through the remaining portion of the loop and slowly pull the running line to begin tightening the knot.
Sept 5: Once the wraps are snug behind the hook eye wet the knot, hold the hook and running line in opposite hands and pull hard to set the knot. Clip off the remaining tag.

Improved Albright Knot
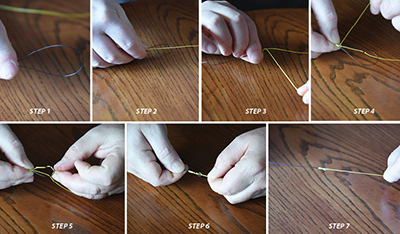
Super braid lines are ubiquitous among saltwater anglers today, but braid should always have a mono or fluorocarbon topshot or leader section between the end of the braid and the terminal tackle. There are dozens of overly complex knots for this purpose, but this improved version of the long-time favorite Albright Knot is versatile, compact and easily passes through guides when casting and retrieving.
Step 1: Form a loop in the leader material.
Step 2: Pass the braid through the loop leaving six inches of tag line.
Step 3: Pinch the mono loop and braid between the fingers of one hand and bring the braid back around both the running line and the loop.
Step 4: Wrap the loop and running line with the tag line of the braid at least seven times. If you are working with very light leader and braid you can wrap up to 10 times. This increases the performance of the knot with thinner diameter line.
Step 5: Hold the wraps between your thumb and finger to prevent it from unravelling and pass the braid through the mono loop twice.
Step 6: Gently pull on both the running and tag end of the braid while holding the mono leader in your other hand and slide the wraps up to the top of the mono loop.
Step 7: Wet the knot with saliva and pull the braid hard to lock it into position. Clip the mono and braid tag ends close to the knot.

Dropper Loop
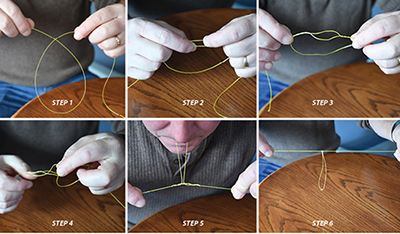
Some fishing applications, especially bottom fishing, call for a loop to be tied in the leader to add a sinker or a hook on its own leader. It is almost always tied in monofilament or fluorocarbon line or leader materials. The dropper loop has been around as long as there have been fishing rods and will get the job done.
Step 1: Start with 15 or 20 inches of line between your hands and form a large open loop.
Step 2: Where the tag and running lines cross use your fingers to spread them apart and begin winding one of the legs around the other to create another loop. It does not matter which leg you use.
Step 3: This is how it will look. If you let go of the new loop using mono line it will simply unravel so keep the line under control.
Step 4: Using some finger dexterity reach through the new small loop, grab the belly of the large loop and pull it back through.
Step 5: Since you only have two hands, grab the new loop with your mouth while you hold the tag and running ends in your hands. Gently pull to begin tightening the wraps. They will come together as you pull.
Step 6: Once the knot is lightly snug you can release the loop from your teeth, wet the knot and pull it tight to lock it.
These are our most trusted knots and will cover the majority of your fishing needs for numerous inshore saltwater fishing situations. Take some time to learn and practice each knot so tying them on the water becomes second nature. If you’re fishing venue moves offshore to chasing larger tuna, shark and billfish, the lines you will use are heavier and many connections are made using mechanical means - crimps and swages. We’ll save that for another instalment of Yamaha Saltwater Fishin’.
Back to Blue Life
In the following photos note that we used heavy yellow braid making the steps easier to see. The line type recommended for each knot is mentioned in the description. You will see two terms in each set of instructions—the tag and the running line. Tag is the end of the line or leader being used and running is the line that leads to the rod and reel. And a word of advice that pertains to all fishing knots—tightening the knot at the end is the most important part of the procedure. You can do everything right but if you rush the sinching and final setting of the knot it will not be as strong and will eventually fail.

Uni-Knot
Let’s start with a long-time favorite that is used to tie on a straight-eye hook, snap, swivel—pretty much any type of terminal tackle using monofilament or braid. It’s incredibly easy and tests out to over 95%of the breaking strength of the line when tied carefully.
Step 1: Run the line through the hook, or in this case a snap, and leave yourself at least six inches to work with on the tag end.
Step 2: Using the fingers of both hands form a loop in the tag end line alongside the running line.
Step 3: Now run the tag end through the loop and around the running line five times for monofilament or six or seven times when
using braid.
Step 4: Gently pull on the tag end to begin tightening the loop until it is bunched up cleanly, but don’t pull it tight yet. Make sure none of the wraps cross over another when tightened.
Step 5: Hold the snap or hook in one hand and the running line in the other. Wet the wraps with saliva and slide them down. Pull hard to lock the knot in place and clip off the tag end.

Snell Knot
A snell knot is used when tying on hooks with eyes that are offset up or down. This allows for a straight pull between the line and the hook shank. Hooks are almost always snelled using monofilament or fluorocarbon leader material. While there are several versions of this knot, this one is the easiest to tie and it tests out to 100% of the breaking strength of the line.
Step 1: Run the line through the hook eye with about five inches of tag to work with.
Step 2: Make a loop with the tag line and pinch it between your fingers.
Step 3: Wrap the remaining tag line around the loop and hook shank five or six times working towards the bend of the hook.
Step 4: Pass the tag end through the remaining portion of the loop and slowly pull the running line to begin tightening the knot.
Sept 5: Once the wraps are snug behind the hook eye wet the knot, hold the hook and running line in opposite hands and pull hard to set the knot. Clip off the remaining tag.

Improved Albright Knot
Super braid lines are ubiquitous among saltwater anglers today, but braid should always have a mono or fluorocarbon topshot or leader section between the end of the braid and the terminal tackle. There are dozens of overly complex knots for this purpose, but this improved version of the long-time favorite Albright Knot is versatile, compact and easily passes through guides when casting and retrieving.
Step 1: Form a loop in the leader material.
Step 2: Pass the braid through the loop leaving six inches of tag line.
Step 3: Pinch the mono loop and braid between the fingers of one hand and bring the braid back around both the running line and the loop.
Step 4: Wrap the loop and running line with the tag line of the braid at least seven times. If you are working with very light leader and braid you can wrap up to 10 times. This increases the performance of the knot with thinner diameter line.
Step 5: Hold the wraps between your thumb and finger to prevent it from unravelling and pass the braid through the mono loop twice.
Step 6: Gently pull on both the running and tag end of the braid while holding the mono leader in your other hand and slide the wraps up to the top of the mono loop.
Step 7: Wet the knot with saliva and pull the braid hard to lock it into position. Clip the mono and braid tag ends close to the knot.

Dropper Loop
Some fishing applications, especially bottom fishing, call for a loop to be tied in the leader to add a sinker or a hook on its own leader. It is almost always tied in monofilament or fluorocarbon line or leader materials. The dropper loop has been around as long as there have been fishing rods and will get the job done.
Step 1: Start with 15 or 20 inches of line between your hands and form a large open loop.
Step 2: Where the tag and running lines cross use your fingers to spread them apart and begin winding one of the legs around the other to create another loop. It does not matter which leg you use.
Step 3: This is how it will look. If you let go of the new loop using mono line it will simply unravel so keep the line under control.
Step 4: Using some finger dexterity reach through the new small loop, grab the belly of the large loop and pull it back through.
Step 5: Since you only have two hands, grab the new loop with your mouth while you hold the tag and running ends in your hands. Gently pull to begin tightening the wraps. They will come together as you pull.
Step 6: Once the knot is lightly snug you can release the loop from your teeth, wet the knot and pull it tight to lock it.
These are our most trusted knots and will cover the majority of your fishing needs for numerous inshore saltwater fishing situations. Take some time to learn and practice each knot so tying them on the water becomes second nature. If you’re fishing venue moves offshore to chasing larger tuna, shark and billfish, the lines you will use are heavier and many connections are made using mechanical means - crimps and swages. We’ll save that for another instalment of Yamaha Saltwater Fishin’.
Back to Blue Life
